 For a very long time I thought my backbends were tight because my back was tight. I don’t mean to humblebrag, but, uh, logic is one of my strong suits. Unfortunately, my logic was causing me to see only half of the picture: My hips were impeding me just as much as my computer slouch.
I had to change my perception of backbends: They not only require bending your spine, they require openness along the whole front side of your body. In other words, it might not be your spine and back muscles that are hanging you up in your backbends, it might be tightness along the front of your thighs, hips, and abdomen.
Most of us are tight there as a result of sitting for long periods of time. This tightness makes it difficult to tilt the pelvis backward (posteriorly) — think hip bones lifting, tailbone dropping. This backward tilt of the pelvis is necessary if you want to create an even backbend. If you can’t get your pelvis into position, you’re more likely to compensate by overarching your lower back.
WHY WE LOVE KING ARTHUR’S POSE:
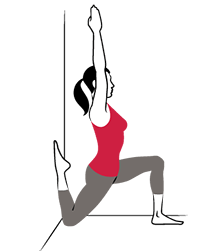
King Arthur’s Pose and its variations intensely targets quads and hip flexors, making it a great prep for backbends. It’s also adjustable: You can press your hips all the way back against the wall to really target the quads. Or you can lower your hips (like a Low Lunge) if you want to get more into the hip flexors and adductors.
WHAT EXACTLY DOES IT STRETCH?
The effectiveness of King Arthur’s Pose stems form the fact that it stretches all of your quadriceps and hip-flexors simultaneously. The technical reason for this is that your knee is flexed and your hip is extended. This means that the posture is stretching your vasti muscles (3 of your 4 quadriceps), your rectus femoris (your 4th quadriceps which is also one of your hip-flexors), and your illiopsoas. If your abdominals are particularly tight, you might also stretch them in this posture.
HOW TO:
A friendly PSA: It can take some experimenting to get into the pose. Be patient and play around with what feels most effective. Knee pain = back off. It is not worth (ever) hurting your bod in an effort to do a pose.
1. Start on your hands and knees with your back facing a wall. Bend your knees and back up, placing your right knee against the wall.
2. Press your right shin and the top of your right foot against the wall.
3. Step your left foot forward so that your foot and your knee at the wall are about the same distance apart as they’d be in a Low Lunge. Take a breath.
4. Place both hands on your front knee and lift your spine. If your knee is uncomfortable, make sure to pad it sufficiently.
5. Refine it: Lift your hip points up, draw your front ribs and navel in, (toward the wall behind you) and reach your arms toward the ceiling.
6. Take 5-6 slow deep breaths before releasing the posture and taking your second side.
BE MINDFUL OF:
Moving your pelvis toward an anterior tilt: If you find yourself sticking your bottom out, it’s a sign that you need to come out of the stretch a little bit. To counteract an anterior tilt, think of lifting your hip points up toward the ceiling as your tailbone drops toward the floor.
Similarly, keep your spine upright, not leaning forward. If you feel any strain, bring your hands to the floor or to blocks.
WHAT POSES WILL THIS HELP ME WITH?
King Arthur’s Pose is an excellent prep for Urdhva Dhanurasana (aka Wheel Pose or Upward Bow Pose) and the whole Pigeon family of poses, which require you to keep your pelvis stable while one leg stretches forward and the other stretches back.

WHERE SHOULD I PUT IT IN A SEQUENCE?
I usually place this pose after Sun Salutations and standing poses. It’s a natural place to pause and give take a breather. As you hang out in the pose for at least 20 breaths, you can remind yourself that this period of focused effort reward you with more playful backbends later.
This is also the perfect “TV watching” or “newspaper reading” pose. Hang out in it while you watch the Bachelorette and your whole family will be impressed!
{illustrations by MCKIBILLO}
